
It might sound a little odd to move a project from one editing suite to what could be considered its biggest rival, but many people find they want to send Premiere Pro projects to DaVinci Resolve.
If you’re one of those people, this article is for you! Let’s take a look at why and how to export Premiere Pro projects to DaVinci Resolve in a few different ways.
Premiere Pro and DaVinci Resolve
Both DaVinci Resolve and Premiere Pro are non-linear editors, which basically means you can edit any part of your project and add and remove things at any point—you don’t have to work from start to finish in order.
Premiere Pro
Premiere Pro has had years of building up its reputation as the industry standard for editing video, and that reputation is well deserved: it’s instinctive and has a lot of powerful tools. However, it’s quite expensive, and because it’s a subscription, it’s an ongoing cost, which is the main issue filmmakers face when choosing this video editing software.
DaVinci Resolve
DaVinci Resolve, on the other hand, is free, or you can buy the Studio version outright for $295.
Resolve has a similar interface to Premiere Pro but is not so good at text, graphics, and audio—all things that can either be done in Premiere Pro or that another Adobe program links to seamlessly: After Effects for graphics and Audition for audio, for one.
Where DaVinci Resolve has really upped its game, though, is in color correction and color grading. Its in-depth tools mean that not only can you grade to a professional standard, but you can also balance and match footage from across different cameras and sources.
Both pieces of software have their pros and cons, and that’s why you might want to use them together: Premiere Pro for your construction and timeline editing, and DaVinci Resolve to color grade.
Without further ado, let’s see how you can export Premiere Pro projects to DaVinci Resolve for color grading.
How to Import Video to DaVinci Resolve With Scene Cut Detection
One simple way to get a video into DaVinci Resolve is to use Scene Cut Detection to import. If you’re just doing color work you won’t need audio, graphics, and so on, so you can either flatten the timeline or remove those elements and just export the video, then use this feature in DaVinci Resolve. This is a handy way to import any project that doesn’t have graphics and overlays, from any editor.
To learn more about this, head over to our step-by-step tutorial on Envato Tuts+, which also has a YouTube video:
If you’re interested in a top-level overview of the export process in Premiere Pro with the latest features, however, make sure to check out this other video from Envato Tuts+.
We also have an in-depth general tutorial about exporting from Premiere Pro, but you can skip this and follow the settings below if you’re already familiar with exporting from Premiere Pro.
How to Send Premiere Pro Projects to DaVinci Resolve Using Metadata
For more complex projects, next we’ll look at how to send your project to DaVinci Resolve from Premiere Pro using metadata. This method includes more information, like track names, markers, and audio volume settings.
Export file types in Premiere Pro
You’ll likely use one of two export types—XML and EDL—and it’ll depend on your reasons and needs for doing it. In this section, we’ll go through them and explain the others so you can make the best choice. Neither XML nor EDL files are proprietary like Project files are, meaning they aren’t specific to one type of program.
Before you start: to export to some file types, you might need to flatten/render some sequences, so make sure you create a duplicate first, just in case.
A Quick Note on OMF (Open Media Framework) and AAF (Advanced Authoring Format) File Types
AAF is the newer version of OMF and contains more information than its predecessor, most notably audio volume automation and track names.
AAF is similar to XML format but is made to include audio and also has Avid support.
EDL: Edit Decision List
An EDL file is—as the name might suggest—a list of events, information, and general metadata about your project, including things like transitions and durations. It’s designed to help you migrate timelines from one editing suite to another.
Although video makers tend to favor XML—which we’ll come to—a professional colorist might ask for an EDL file as it’s the simplest method of rebuilding your timeline, particularly when they won’t need any of your audio or effects in order to color the video. An EDL file is easy for both computers and people to read as it’s essentially a line-by-line breakdown of everything in the edit.
The main issue with using an EDL is that it’s not able to store complicated timelines, so you’ll need to flatten your video down to one track.
EDLs work best with projects that contain no more than one video track, two stereo audio tracks, and no nested sequences. Most standard transitions, frame holds, and clip speed changes also work well in EDLs. — Adobe
An EDL file can offer a smoother export than other file types, but because it only works properly with one video track, you will need to render/flatten your video. This option is a quicker one if you’re doing roundtrips from Premiere Pro to DaVinci Resolve and back again because you’re exporting and importing the least information.
If you’re leaving Premiere Pro to move to DaVinci Resolve, then this probably isn’t the option for you.
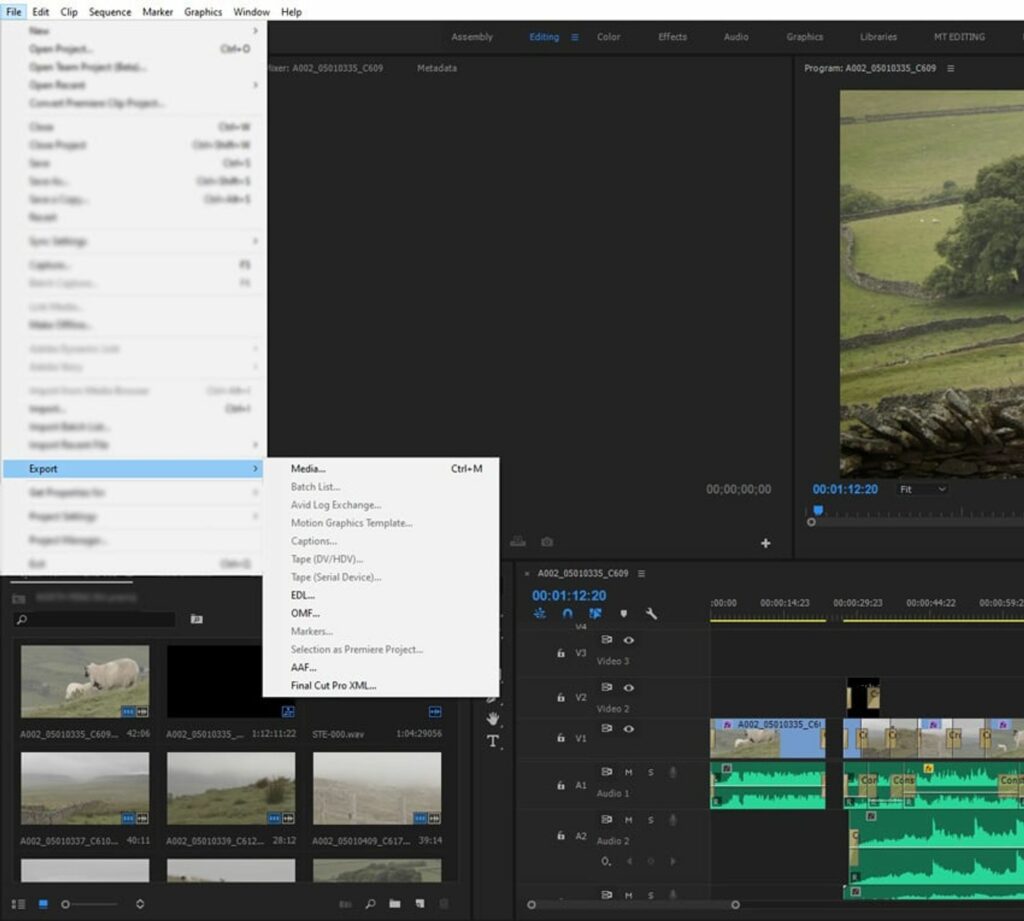
Exporting From Premiere Pro as an EDL
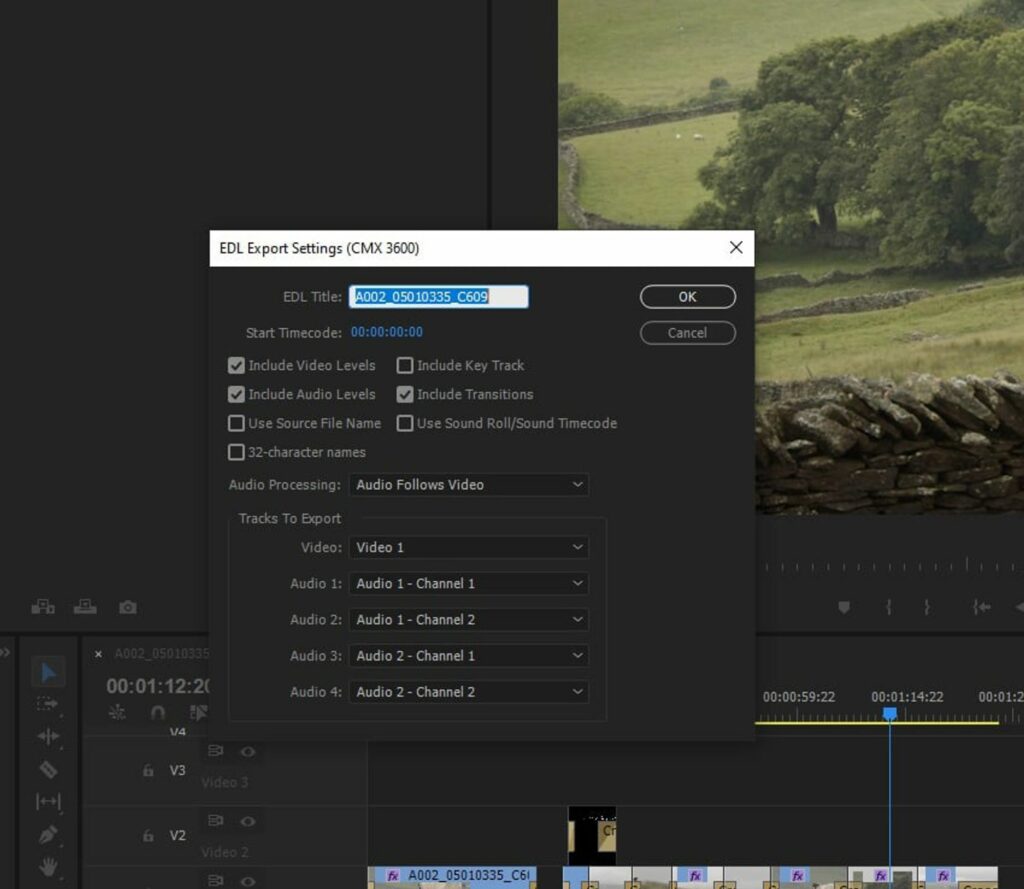
EDL export settings
File > Export > EDL
As mentioned, you won’t need audio levels or graphics like transitions if you’re just doing color work, so you can untick those if you want to. If you do bring across transitions, they might look different in DaVinci Resolve—either black or a similar transition—but they’ll go back to what they were when you export and flip back to Premiere Pro.
Importing in DaVinci Resolve
Importing into DaVinci Resolve
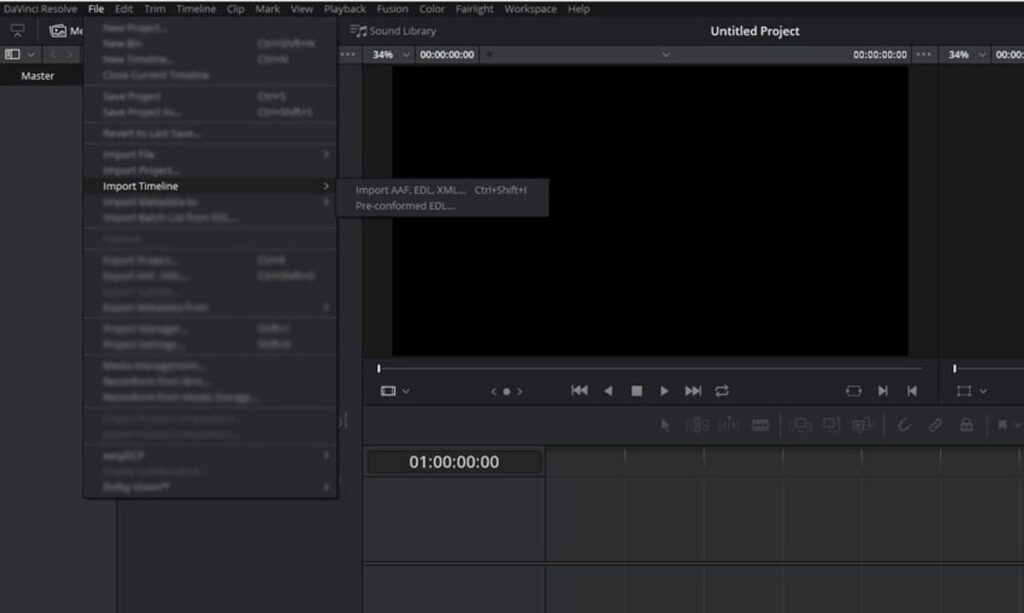
File > Import Timeline > Pre-conformed EDL
Once your timeline has imported, scrub through it to make sure that everything has arrived and looks right. Then you can work on your color, and when you’re finished, render out ready to export. You can export the file as either a single clip or individual clips.
XML: Extensible Markup Language
File > Export > (Final Cut Pro) XML
As mentioned earlier, XML files aren’t proprietary like project files, meaning they aren’t specific to one type of program, so it’s worth having an XML copy of all your projects in case you ever need to open them up in a different program in the future. Think of it as good archiving and future-proofing!
It makes sense, then, that if XML files are designed for transferring information between applications, it would be a sensible file format for sending Premiere Pro projects to DaVinci Resolve, and vice versa.
Like EDL files, XMLs are a sort of guide to what your project contains, without actually having any media in them. Think of them like a map to where the components are stored. For this reason, it’s important to be very organized with your project files so that you can easily locate them from one place if you need to.

XML translation report
There aren’t any additional options when you’re exporting as an XML file (unlike EDL) as it just makes a ‘map’ of everything, though when you hit Export, you may see this Translation Report message. This doesn’t necessarily mean there’s been an issue. It usually relates to anything that might not be faithfully translated for another program. So like the transitions example mentioned in the EDL section, this could be something that doesn’t have a matching equivalent in its XML translation and might be removed or altered. If so, it will tell you in the translation report.
Again, this isn’t really an issue if you’re using DaVinci Resolve only to color grade, in which case you can ignore any translation problems—or better yet, use Remove Attributes first to take any effects out of clips entirely for the export. However, if you want to faithfully export your project to pick up again permanently in DaVinci Resolve, then one solution would be to render any Premiere Pro-specific effects down into the clip so that they come across as part of that.
It’s worth noting that occasionally translation errors in an XML file can cause problems or broken files, so it’s important to check your file has been imported entirely and accurately once in DaVinci Resolve.
Importing in DaVinci Resolve

Importing in DaVinci Resolve
File > Import Timeline > Import AAF, EDL, XML
Importing is the same as the EDL steps, but this time select the Import AAF, EDL, XML option.
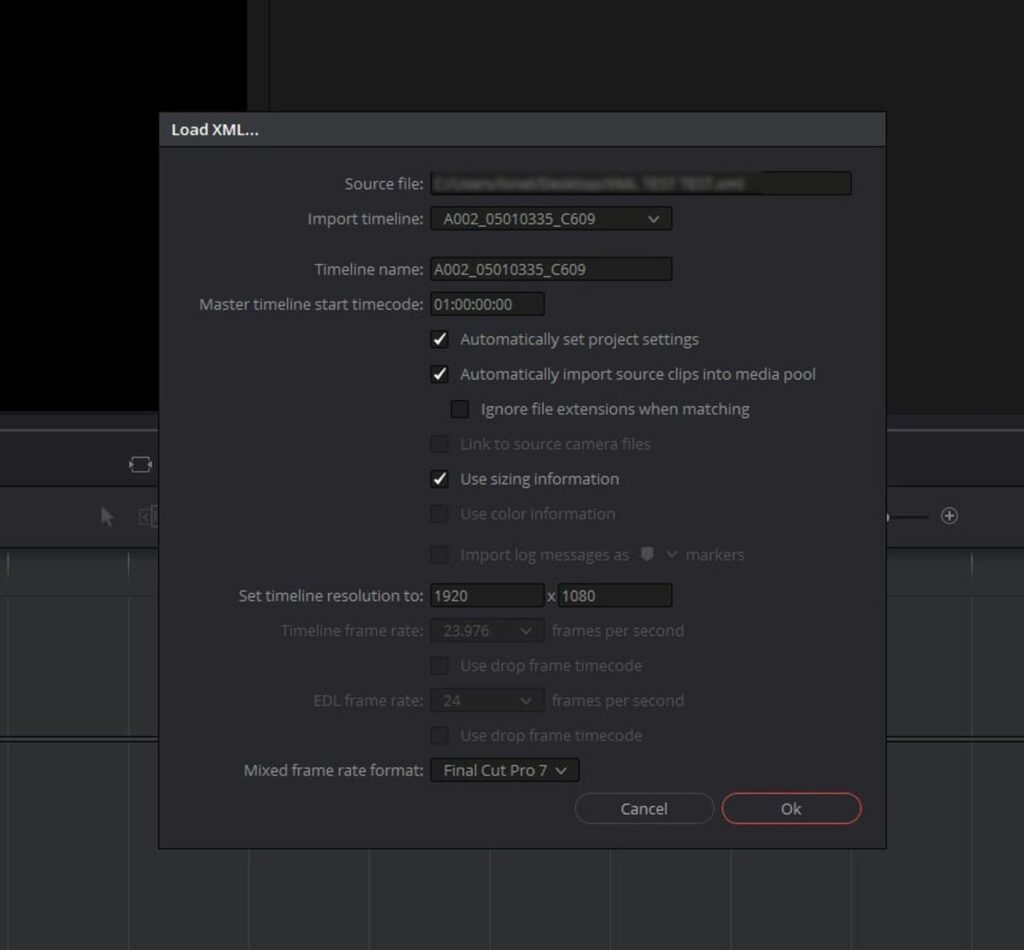
Import XML into DaVinci Resolve
You’ll get a dialogue box with settings that should match your project from Premiere Pro, but just double-check everything and make sure it’s right.
Round-Trip or One-Way Move
Whether you’re leaving Premiere Pro for good to move to DaVinci Resolve or just doing a round-trip for some color grading, hopefully you now have a better understanding of the file types you might use and the preparation to do in order to get the best result.
The most important thing to remember before doing anything at all is to make a duplicate of your project, just in case. That way, if something goes wrong or a file corrupts or doesn’t translate properly, you’ve always got your original project to go back to.
Keep Creating with DaVinci Resolve Video Templates
With Mixkit’s free DaVinci Resolve templates, you can elevate your videos with professional-grade color grading. No more spending hours tweaking and adjusting colors – these templates have already done the hard work for you. Not only do these templates save you time and effort, but they also open up a world of creative possibilities. Experiment with different looks and styles, explore new color palettes and bring your vision to life in ways you never thought possible.
Simply choose the template that suits your project, apply it to your footage, and watch as your visuals go from ordinary to extraordinary!


